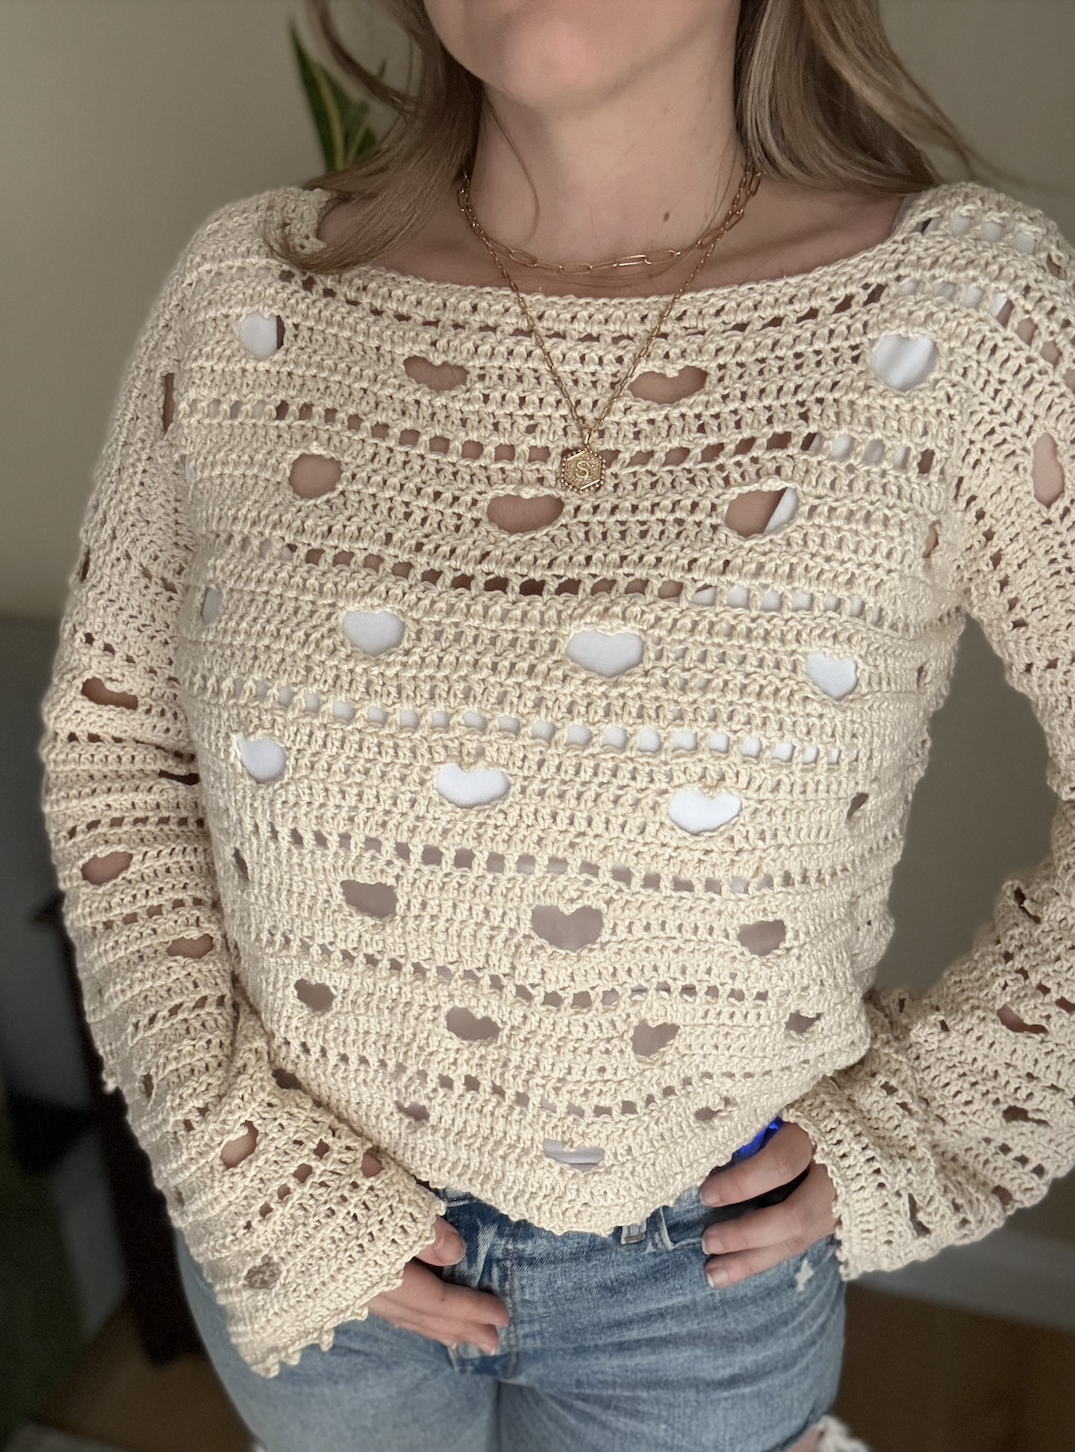
Welcome back to my blog! I love sharing FREE crochet patterns with you all sooo much and I can’t even tell you how excited I am for this new pattern!! I designed this Lovely Lacy Top to really embrace the best parts about crochet! There are beautiful lacy details in the shape of hearts. It looks really intricate but it is made completely out of the basic crochet stitches so don’t worry! PLUS if you do need extra help with this pattern – I also have created a FREE full step-by-step video tutorial that you can watch on my Youtube here! I know – super exciting 🙂 🙂 🙂
This Lovely Lacy Top is designed to be a boxy drop-shoulder top with long sleeves. I used a lightweight (3) sized yarn but since this top is made to measure you can use any yarn or hook that you’d like! And you can totally customize the top to your liking by making it cropped or full legnth – short sleeved or long sleeved – or you can just take the row repeat and make whatever else you want with it. I think a cardigan would be really beautiful too!
To purchase the inexpensive ad-free PDF download of this pattern, you can do so here!
A quick disclaimer—Please do not copy, redistribute, or resell this pattern in any way, including creating a video tutorial. You may sell your finished piece but please credit me as the pattern designer.
If you share your piece on social media, please credit me as the pattern designer. I would love if you tag me!! I really enjoy seeing your beautiful work.
This post contains affiliate links, I may earn a small commission if you shop from my links with no additional cost to you.

Materials
- Yarn – any. I used 9 skeins (450g/1179 yards) of Hobbii Friends Cotton Silk in Oatmilk, a lightweight (3) yarn. You’ll need (350g-650g depending on size)
- Hook – 4 mm or similar
- Tapestry needle – to weave in the ends
- Scissors – to cut your yarn
- Stitch Markers
- Measuring Tape
Gauge
15 st x 8 rows of dc = 4’ x 4’ (10 x 10 cm)
Abbreviations
Sl st = Slip Stitch
Ch = Chain
Sc = Single Crochet
Hdc = Half Double Crochet
Dc = Double Crochet
St = Stitch
Sp = Space
Inc = Increase
Dec = Decrease
Sk = Skip
Important Pattern Notes
- This pattern uses US crochet terms.
- Turning ch 2 does not count as a stitch.
- This pattern is worked in sets of 7 stitches & a 5 row repeat.
- Increase means to add 2 stitches into the same stitch.
- Decrease is to make 1 stitch out of 2.
Measurements
Bust width (A): Measure around your bust and then add 10 inches positive ease and divide by 2.
Arm width (B): Measure around your upper arm or the largest part of your arm and then add 1 inch of positive ease.

Finished Top Measurements
Example for a size M top with a 38 in bust and 13 in arm circumference, the finished top measurements are:
Bust width (A): 24 inches
Arm width (B): 14 inches
Top Length & Arm length can be made any size you wish! You can make it cropped or full length, short sleeved or long sleeved, all by making more or less rows.
Special Stitches
This pattern uses Picot which is simply 3 chains and a slip stitch.
- Picot: chain 3 and then insert hook into the third chain from hook and make a slip stitch. This creates a cluster of chains on top of your work.

- Downward Picot: chain 3 and pull your hook down and twist, so you can then insert hook into the back loop of the third chain from hook and make a slip stitch. This creates a cluster of chains facing downward on your work. If you need more help – remember that I have a full step-by-step video tutorial you can watch! 🙂

Let’s get started!
Stitch Chart
The stitch chart is a visual representation of the written instructions. If you can’t read the stitch chart, don’t worry, follow the written directions and you will get the correct result. This is just added for people who prefer stitch charts. 🙂

The pattern is worked in multiples of 7 + 2 (turning chain) and a 5 row repeat beginning on row 2 after the foundation dc row. This chart shows two 7 stitch sections, the solid dc x 7 section, and the heart section, and two repeats. Note that the solid and heart sections are worked alternating each repeat.
Written Pattern
BODY PANELS (make 2)
Row 1: Make a foundation Ch as long as your bust measurement (A) in a multiple of 7 + 2. Round up if needed. For mine I ended up with a chain of 91 + 2. Dc in the third chain from hook and in each st across.
Row 2: Ch 2 and turn. Dc in each st across. (Ch 2 does not count as a stitch for this row or all future rows)
Row 3: Ch 2 and turn. (Dc, hdc, sc, sl st, sc, hdc, dc. Then dc x 7.) Repeat this pattern for the entire row.
Row 4: Ch 2 and turn. Depending on the length of your foundation chain, you either ended on a dc x 7 section or a dc, hdc, sc, sl st, sc, hdc, dc section aka “bottom half of the heart”.
If you ended row 3 with dc x 7 then: (Dc x 7. Dc, ch 2, downward picot, ch 2, sk 5, dc.) Repeat this pattern for the entire row.
If you ended row 3 with the bottom half of the heart then: (Dc, ch 2, downward picot, ch 2, sk 5, dc. Then dc x 7.) Repeat this pattern for the entire row.
Row 5: Ch 2 and turn. Dc in each st and in each ch across, including the top of the picot, making sure that the picot cluster remains facing downward to form the top of the heart.
Row 6: Ch 2 and turn. Dc in the first st. Then (ch 1, sk 1, dc.) Repeat this pattern for the entire row. Note: if your foundation chain was an even number, you will have an extra stitch at the end of this sequence. Make a dc in the last stitch. It will be hidden in the seam so don’t worry about it.
Row 7: Ch 2 and turn. Dc in each st and ch sp across.
Row 8: Ch 2 and turn. Look to see how the edge of your work looks in the 4 rows below. Does it start with a heart or a solid section of dc? We will want to alternate the heart each time.
If your work below has a heart then: (Dc x 7. Then dc, hdc, sc, sl st, sc, hdc, dc) Repeat this pattern for the entire row.
If your work below has a solid dc section then: (Dc, hdc, sc, sl st, sc, hdc, dc. Then dc x 7.) Repeat this pattern for the entire row.
Row 9: Ch 2 and turn.
If you ended row 8 with dc x 7 then: (Dc x 7. Dc, ch 2, downward picot, ch 2, sk 5, dc.) Repeat this pattern for the entire row.
If you ended row 8 with the bottom half of the heart then: (Dc, ch 2, downward picot, ch 2, sk 5, dc. Then dc x 7.) Repeat this pattern for the entire row.
Row 10: Ch 2 and turn. Dc in each st and in each ch across, including the top of the picot, making sure that the picot cluster remains facing downward to form the top of the heart.
Row 11: Ch 2 and turn. Dc in the first st. Then (ch 1, sk 1, dc.) Repeat this pattern for the entire row. Remember if your foundation chain was an even number, you will make an extra dc stitch at the end of this sequence.
Repeat rows 7-11 until you have reached the length that you want for your body panels. I recommend adding a row of dc at the very end. I did a total of 37 rows.
Repeat to make another panel. If your first panel has hearts on both ends of your first repeat, like mine does, make the other panel starting with a solid dc section so when you seam it together the pattern will align. See photo below.

SLEEVES (make 2)
Row 1: Make a foundation Ch as long as your arm measurement (B) in a multiple of 7 + 2. Round up if needed. For mine I ended up with a chain of 56 + 2. Dc in the third chain from hook and in each st across.
Note: Your sleeve seam will be under your arm. If your chain is an even number of stitches the panel will connect with the heart pattern alternating seamlessly. If your chain has an odd number, it will connect with a heart by a heart on your seam. It won’t be too noticeable but if you prefer to add another 7 st section or add a couple chains on each end and work dc in them up the sides, feel free to do so.
Row 2 and on: Refer back to the body panel pattern starting from row 2: The pattern is the same. I did a total of 42 rows for my sleeves. This top is a “dropped shoulder garment”, so your sleeve panel will be shorter than your arm length to account for that lowered shoulder seam (about 3-4 inches shorter). Leave a long tail about 2.5 x the width of your sleeve to seam.
Neckline
Lay out your panels and add stitch markers where you want your neckline/ head hole to be. Make sure they are central by counting how many stitches from the edge they are. Ensure they are the same on each side and each panel. I made mine 27 stitches from the outside.
Work the shoulder straps on 1 panel only. Attach your yarn at a st marker & work towards the edge.
Row 1: Ch 2 and dc in the same st. (Ch 1, sk 1, dc in the next st). Repeat this pattern to the end of the row. You may need to add an extra dc at the end if you have an even number of sts.
Row 2: Ch 2 and turn. Dc in each st and ch sp across until you have 2 sts left then dc dec.
Row 3: Ch 2 and turn. Dc dec in the first 2 sts, then dc in each st across.
Row 4: Ch 2 and turn. Dc in each st, then dc inc in the last st.
Row 5: Ch 2 and turn. Dc inc in the first st, then dc in each st across.
Row 6: Ch 2 and turn. Repeat instructions in Row 1. Fasten off yarn with a long tail twice as long as your shoulder strap is wide.
Repeat on the other side.
Assembly
Now it is time to seam our panels together. Place your body panels together like below, wrong sides facing up. Sew along the shoulder strap making sure the stitches are lined up evenly. I used a whip stitch. Insert your needle through the stitch on the front then the back panel and pull through. Repeat all the way down.


Now line up your sleeve panels with the center lined up with the center of your shoulder strap. My sleeve was 56 chains so I counted 28 stitches on each side and added a stitch marker.
Working again on the wrong side, seam the sleeves to your body panels. You will be working into the raw edge of the stitches. I recommend that 2 stitches from your sleeve be seamed along 1 sideways dc stitch from the body panel.

Fold your top down on itself, with wrong sides facing out.
You will now seam up and along the body panel, then along the length of the sleeve. Repeat for the other side.

Final Touches
Neckline
Attach your yarn at a stitch in a corner of your neckline, ch 1, then sc evenly along each stitch. Make 2 sc in the sideways dc stitches. Once you have sc all around, sl st to your first sc and then fasten off your yarn.
Trim
Attach your yarn near the join on the bottom of your body panel. Ch 1, then sc in the same stitch and the next 3 stitches. Then make a picot. (Sc in the next 4 stitches and then make another picot.) Repeat this pattern all the way around then sl st to your first sc and fasten off your yarn. You might need to add or takeaway a sc when you get to the end, just try to keep it as even as possible.
Repeat this again on the bottom of each sleeve.

Weave in all ends and then …

You’re all done!
I would LOVE to see your creation! If you crochet this Lovely Lacy Top please tag or DM @woolymamacrochet on Instagram so I can like & share!
If you have any questions or need help, PLEASE send me a message or leave a comment on this post.
If you enjoyed this pattern, please check out my other free patterns for wearables! Like the Granny’s Cabin Shrug, High Neck Granny Halter Top, Checkerboard Beanie or Coco Summer Crop Top! Thank you for checking out my blog and be sure to subscribe to my email list so you never miss a new free pattern!
Comments
2 responses to “The Lovely Lacy Top: Free Crochet Pattern + Video Tutorial”
Awesome
This top is so cute. I saw it on Pinterest and I just ordered my yarn to make it