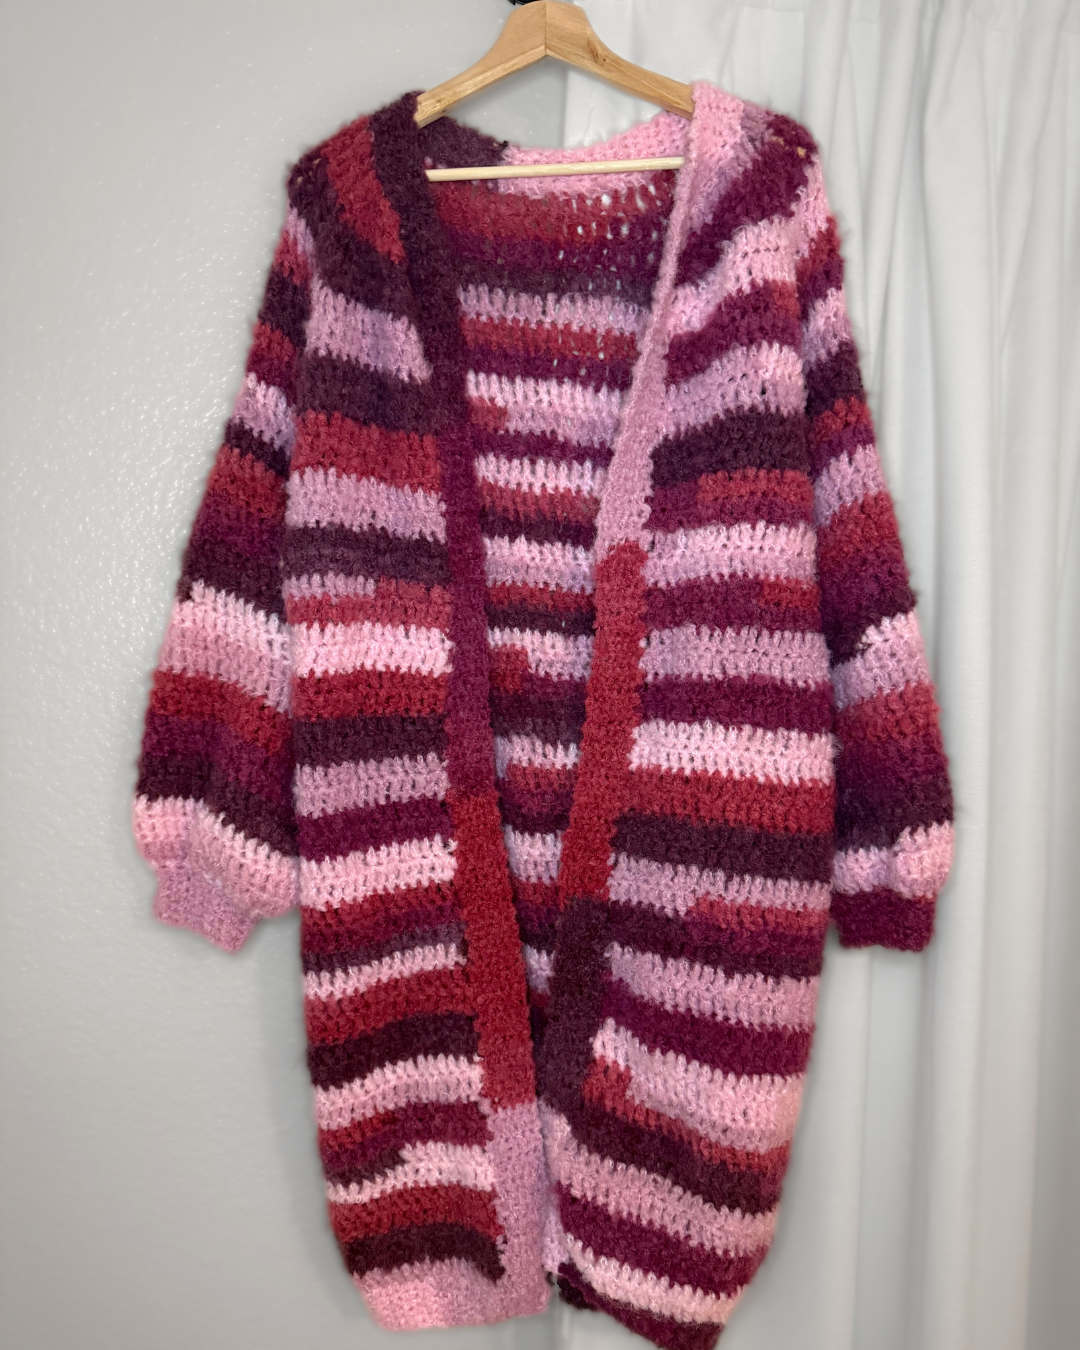
Welcome back to my blog! Today I am sharing this super cozy, easy to crochet, Cloudy Day Cardigan! I designed this based on the new Cloudy Delight yarn from Hobbii, it is sooo soft and fluffy and cozy and lightweight and beautiful and And AND! Hahah I really enjoyed working with this yarn. HOWEVER you can use any weight 5 yarn you like and it should still come out great! I had 12 amazing pattern testers that used an assortment of different yarns. You can find picture of them on my Instagram or in the Lookbook of my downloadable PDF pattern available on my Etsy.
This Cloudy Day Cardigan is made working from the top down, and it is a NO-SEW pattern! If you haven’t made a garment from the top down yet, this is a perfect pattern to try! My favorite part of top-down patterns is that you can try it on as you go to make sure that you are getting your desired fit! Isn’t that so cool?

This pattern is super customizable too. I created mine to be duster length but you can make yours shorter, or longer, with short sleeves or long! Your piece will be totally unique <3
I was able to also create a free video tutorial that you can reference if you need any visual assistance!
To purchase the inexpensive ad-free PDF download of this pattern, you can do so here!
A quick disclaimer—Please do not copy, redistribute, or resell this pattern in any way, including creating a video tutorial. You may sell your finished piece but please credit me as the pattern designer.
If you share your piece on social media, please credit me as the pattern designer. I would love if you tag me!! I really enjoy seeing your beautiful work.
This post contains affiliate links, I may earn a small commission if you shop from my links with no additional cost to you.

Materials
- Yarn – 4-6 skeins of Hobbii Cloudy Delight in color Blushing Horizon, depending on size OR another bulky weight 5 yarn
- Hook – 7 mm and 6 mm for ribbing
- Tapestry needle – to weave in the ends
- Scissors – to cut your yarn
- Stitch Markers
- Measuring Tape
Gauge
10 st x 5 rows of dc = 4’ x 4’ (10 x 10 cm)
Abbreviations
Sl st = Slip Stitch
Ch = Chain
Sc = Single Crochet
Dc = Double Crochet
St = Stitch
Sp = Space
Dec = Decrease
Sk = Skip
Important Pattern Notes
- This pattern uses US crochet terms.
- Turning ch 2 does not count as a stitch.
- This pattern is worked top down, by creating the yoke, then splitting off the sleeve holes and continuing down the body. Then working the sleeves and adding ribbing.
- This pattern is size graded, however you can customize the length.
- Work the pattern in [] brackets in the same stitch.
- This pattern is no sew! 🙂
- Decrease is to make 1 stitch out of 2.
Sizes
You will be able to try on your cardigan as you go to make sure it fits perfectly. This chart can be used as a guide on how much yarn you’d use & an idea of the fit. This cardigan is intended to fit slightly oversized & cozy!

Let’s get started!
Written Pattern
YOKE
For all sizes.
Row 1: With the larger hook, ch 40 + 2 (turning chain does not count as a stitch), dc in the 3rd chain from hook and in every chain, adding a stitch marker to your 5th, 14th, 27th, & 36th stitches.
Row 2: Ch 2 and turn. Dc x 4, [dc + ch 1 + dc] all in the next stitch with the stitch marker, then add the stitch marker back into the ch 1 space. Dc x 8, [dc + ch 1 + dc] in the next stitch with the stitch marker, then again add the stitch marker back into the ch 1 space, dc x 12, [dc + ch 1 + dc] in the next stitch with the stitch marker and again add the stitch marker back into the ch 1 space, dc x 8, [dc + ch 1 + dc] in the next stitch with the stitch marker and add the stitch marker back into the ch 1 space, dc x 4.
Row 3: Ch 2 and turn. Dc in each stitch, and [dc + ch 1 + dc] in each ch 1 space where the stitch markers are. Replace the stitch markers into the newly created ch 1 space.
Repeat row 3 until you can fold your piece like shown below, connnect the bottom stitch markers to create arm holes, and try it on and have it fit comfortable. You should have positive ease of about 2 inches. You want this to be loose so make more rows if you need.
As a guide,
XS/S, would be 11 rows total.
M/L would 13 rows total.
XL/2X would be 15 rows total.
3X/4X would be 17 rows total.

BODY
Row 1: Ch 2 and turn. Dc in each stitch until you reach your first stitch marker. Dc into the ch 1 space, then immediately dc into the ch 1 space where the next stitch marker is. You are skipping all the stitches in between in order to create your arm holes. Continue dc in each stitch until you reach the next stitch marker. Dc into the ch 1 space, then immediately dc into the ch 1 space from the last stitch marker, again skipping all of the stitches in between to create the other arm hole. Dc in the rest of the stitches.
Row 2: Ch 2 and turn. Dc in each stitch across.
Repeat row 2 until you have the length that you want for your cardigan.
As a guide,
XS/S, would 31 rows for the body.
M/L would 33 rows for the body.
XL/2X would 35 rows for the body.
3X/4X would 37 rows for the body.

SLEEVES
Row 1: Attach your yarn at the join of your arm hole. Ch 2, and dc in each stitch. Sl st to the first dc to join. Do not turn your work.
Row 2: Work in the round by making a dc into each stitch.
Repeat row 2 until your sleeve is the length that you want, about 19 rows total. Then finish off the sleeve by making 2 more hdc stitches, then 2 sc, and finish with a sl st. Allow 1.5 inches for the cuff ribbing. Do the same amount of rows for your other sleeve.
SLEEVE CUFFS
Row 1: Attach your yarn at any stitch. With the smaller hook, using sc, crochet 2 together all the way around the entire opening (aka sc dec). Sl st to the first st.
Row 2: Ch 6, sc in the 2nd chain from hook and in the next 4 chains. Sl st to the next stitch on the sleeve, and again in the next stitch on the sleeve.
Row 3: Turn, skip the 2 slip stitches you made to the sleeve and then sc into the next 5 stitches on the cuff.
Row 4: Ch 1 and turn, sc in the 2nd chain from hook and in the next 4 chains. Sl st to the next stitch on the sleeve, and again in the next stitch on the sleeve.
Row 5: Turn, skip the 2 slip stitches you made to the sleeve and then sc into the next 5 stitches on the cuff.
Repeat rows 4 & 5 all the way around. Then flip your work inside out so you are working on the inside of your cuff and sc down to seam the ribbing together. Fasten off your yarn & repeat for the other sleeve.
BODY RIBBING
Row 1: Attach your yarn at the bottom left corner on the front of your cardigan. With the smaller hook, ch 6, sc in the 2nd chain from hook and in the next 4 chains. Sl st to the next stitch on the cardigan, and again in the next stitch.

Row 2: Turn, skip the 2 slip stitches you made to the cardigan and then sc into the next 5 stitches on the ribbing.
Row 3: Ch 1 and turn, sc in the 2nd chain from hook and in the next 4 chains. Sl st to the next stitch on the cardigan, and again in the next stitch. Note: you will work into the sideways dc stitches, and count them as being 2 stitches.
Repeat rows 2 & 3 all the way up and around the neck, it will round around the neckline. Continue crocheting the ribbing until you get back to the other bottom corner on the front of your cardigan.

Once you’re at the bottom corner, sc in each stitch in the ribbing until you reach the outer edge, then ch 6, sc in the 2nd chain from hook and in the next 4 chains. Sl st to the next stitch on the ribbing, and again in the next stitch. See photos below. This gives your ribbing a nice corner.

Continue the ribbing using the same pattern as earlier until you reach the corner where you started. Finish off by working the last part of the ribbing into the beginning starting chain. Fasten off yarn.
Weave in all ends and then …

You’re all done!
I would LOVE to see your creation! If you crochet this Cloudy Day Cardigan please tag or DM @woolymamacrochet on Instagram so I can like & share!
If you have any questions or need help, PLEASE send me a message or leave a comment on this post.
If you enjoyed this pattern, please check out my other free patterns for wearables! Like the Lovely Lacy Top, Granny’s Cabin Shrug, High Neck Granny Halter Top, Checkerboard Beanie or Coco Summer Crop Top! Thank you for checking out my blog and be sure to subscribe to my email list so you never miss a new free pattern!
Comments
One response to “The Cloudy Day Cardigan: Free Crochet Pattern + Tutorial (NO SEW!)”
Oh this is so cute! Cant wait to make this