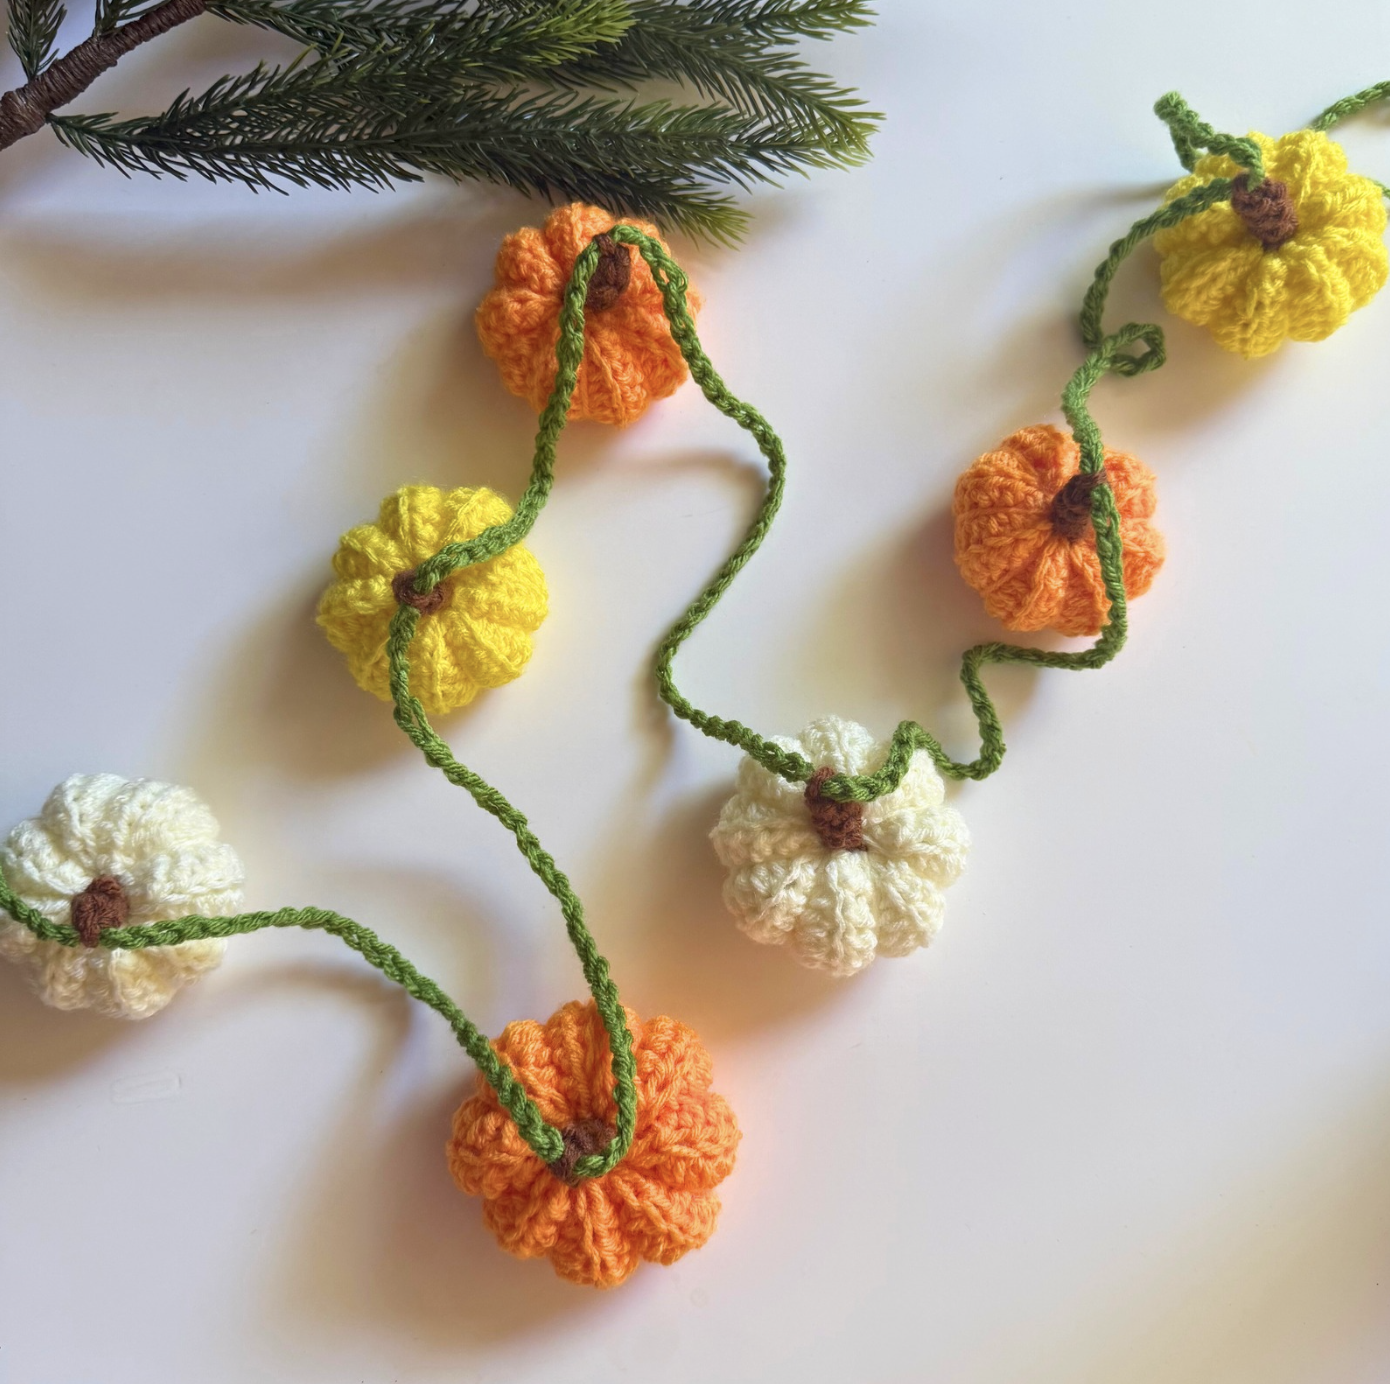
Welcome back to my blog! I’ve been in the fall mood recently and there’s just something about pumpkins that instantly makes me feel like fall is here. The cozy candles, warm drinks, and crisp evenings just aren’t complete without a touch of handmade décor—and this free pumpkin garland crochet pattern might be my new favorite way to bring those fall vibes into the house. Whether you’re decorating for Halloween, Thanksgiving, or simply love all things autumn, this little garland is a quick and charming project.
I designed this pumpkin garland to be beginner-friendly, so if you’ve been wanting to make some festive crochet décor, this is the perfect place to start. The pumpkins work up quickly and use just a small amount of yarn, which makes them a great stash-busting project. Plus, you can customize the colors—classic orange, creamy neutrals, or even pastels for a modern twist. Once you string them together, you’ll have a piece of fall décor you can hang on your mantel, bookshelf, or even across a window.

And the best part? It’s completely free! I love sharing patterns that make seasonal decorating easy and budget-friendly. Handmade décor adds such a personal touch, and every year when I will pull out this pumpkin garland, it’ll make me smile knowing it came from my own two hands (and hook!). So, grab your yarn and let’s dive into the pattern—you’ll be hanging your pumpkin garland up in no time.
To purchase the inexpensive ad-free PDF download of this pattern, you can do so here!
A quick disclaimer—Please do not copy, redistribute, or resell this pattern in any way, including creating a video tutorial. You may sell your finished piece but please credit me as the pattern designer.
If you share your piece on social media, please credit me as the pattern designer. I would love if you tag me!! I really enjoy seeing your beautiful work.
This post contains affiliate links, I may earn a small commission if you shop from my links with no additional cost to you.

Measurements
This pattern is one size and will create pumpkins that are about 1.5×2 inches. You can easily make bigger or smaller pumpkins by using a finer or thicker weight of yarn & recommended hook.
Materials
- Yarn – Any yarn would work! I used medium weight Crafting Acrylic by Hobbii in:
- Ivory (02)
- Bright Orange (10)
- Light Green (35)
- Varsity Yellow (09)
- Toffee (06)
- Hook – 5 mm or the recommended hook for your chosen yarn
- Tapestry needle – to weave in the ends
- Scissors – to cut your yarn
- Polyfil – to stuff your pumpkins
Tip: Mix and match colors for variety! Neutral cream pumpkins look modern, while classic orange keeps things traditional.
Gauge
Gauge is not crucial to this pattern.
Abbreviations
Sl st = Slip Stitch
Ch = Chain
Sc = Single Crochet
Hdc = Half Double Crochet
Blo = Back Loop Only
St = Stitch
Sp = Space

Important Pattern Notes
- This pattern uses US crochet terms.
- Pumpkins measure approx. 1.5 x 2 inches with medium weight yarn + 5 mm hook.
- To adjust size, simply change yarn weight + hook size.
- Turning ch 1 does not count as a stitch.
- The number in ( ) at the end of each row/round is your stitch count.
- Have fun experimenting with different yarn colors!This pattern uses US crochet terms.
Let’s get started!
Pumpkin Crochet Pattern
Row 1: Ch 12, hdc in second chain from hook and in the next 10 ch across. (11)
Rows 2–16: Ch 1 and turn (does not count as a stitch), hdc blo x 11. (11)

Seaming the Pumpkin:
Once you’ve completed the rectangle, it’s time to form the pumpkin shape by seaming the two short edges together. You have two options:
Option 1 – Single Crochet Seam:
- Insert your hook through the first stitch on both edges, pull up a loop, yarn over, and pull through all loops.
- Continue down the edge, working one sc in each stitch.
- Fasten off and cut yarn, leaving a 6-inch tail for finishing.

Option 2 – Needle Seam:
- Use a tapestry needle to sew the two short edges together with your preferred stitch.
Cut your yarn, leaving a long tail.
Using your needle, take the long tail and weave it in and out of each stitch across the open edge to cinch the pumpkin closed. Tie off your yarn with a knot, making sure the pumpkin is closed tight.

Flip the pumpkin inside out if you need to so the seam is inside and won’t be visible. Now stuff the pumpkin with polyfil.
Cut a piece of yarn about 18-24 inches to cinch the other side of the pumpkin closed and to create the pumpkin ridges/indents.

Using your needle, take the yarn and weave it in and out of each stitch across the open edge to cinch the stuffed pumpkin closed and pull tight. I recommend to tie a knot with the other side of the tail to secure.
Now you will create the ridges/indents shaping.
Using the same attached long yarn, insert your needle through the middle of the pumpkin – entering in the center on bottom side, and exiting through the center of the top as shown.

Pull tight so the yarn creates an indent in your pumpkin. I recommend having the yarn in the “valleys” of your stitches. Repeat until you have about 6 to 7 indents.

Tie off yarn to secure.
Stem Crochet Pattern
Round 1: With brown, make a magic circle and sc x 4 into the ring. (4)
Round 2-4: Work in the round. Sc x 4. (4)
Fasten and cut yarn with a 6 inch tail.

Attaching
Make sure your magic circle of your stem is secured, then use your needle with the long tail to sew the stem onto the pumpkin.

Now you can tie knots on your tails and weave them in by pulling them through your pumpkin and trimming.

Repeat to make as many pumpkins as you like. I made some in Orange, Yellow, and White.
Garland
Row 1: With green, ch 10, slip stitch into the first made chain to form a loop. Then chain as long as you want your garland to be (150-200 chains). Cut your yarn leaving a 6 inch tail.
Use your tapestry needle to pull the chain through a stitch on the top of your pumpkin stems. Once all pumpkins are attached, continue on the green chain and slip stitch to the 10th ch from hook to form another loop. Fasten off yarn.
Adjust the spacing between your pumpkins so it’s even and to your liking. green, make a chain as long as you want your garland to be. (Anywhere between 150-200 chains should be good!) Tie off yarn.

Weave in all ends and then …
You’re all done!

I would LOVE to see your creation! If you crochet this Pumpkin Garland please tag or DM @woolymamacrochet on Instagram so I can like & share!
If you have any questions or need help, PLEASE send me a message or leave a comment on this post.
If you enjoyed this pattern, please check out my other free patterns! Like the Flower Garland, Halloween Patchwork Cardigan, or Granny’s Cabin Shrug! Thank you for checking out my blog and be sure to subscribe to my email list so you never miss a new free pattern!

