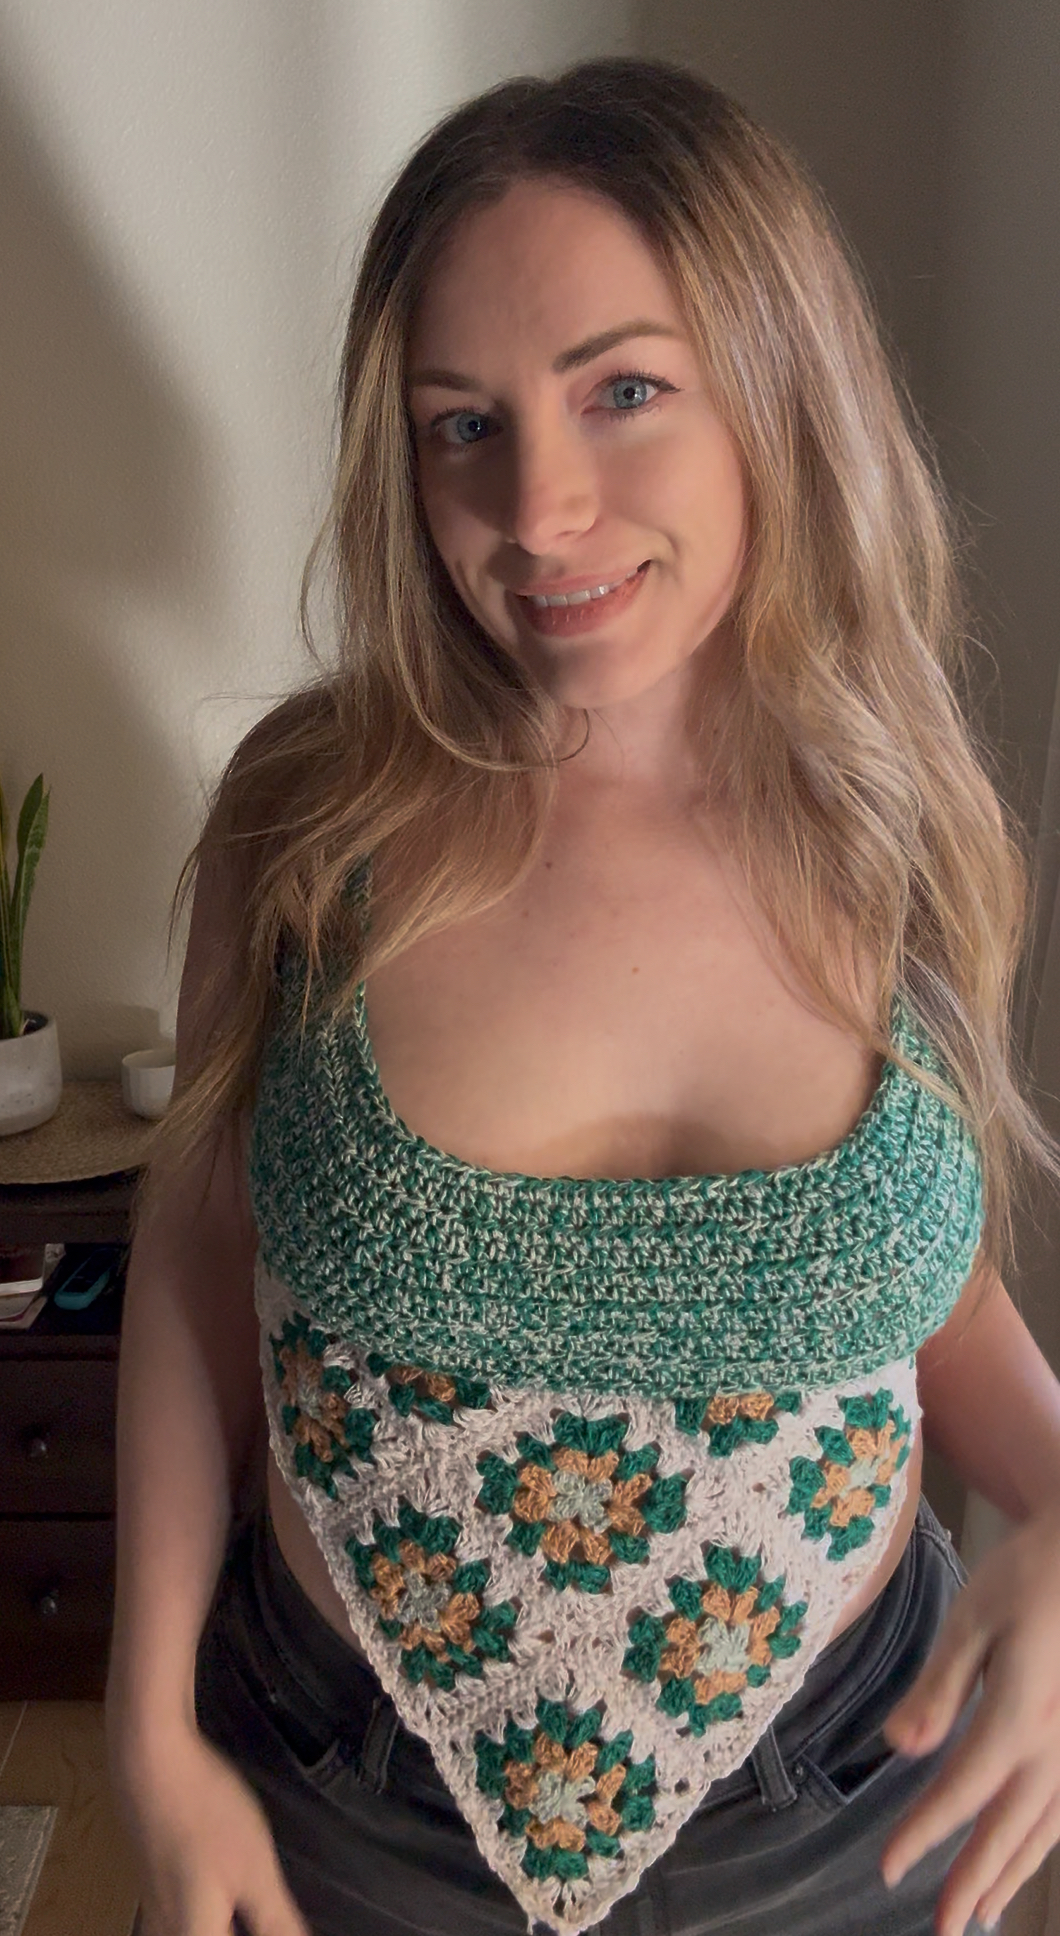
Welcome back to my blog! Today I have a super fun and easy summer top to share with you. Say hello to your new favorite summer make — the Granny’s Bandana Top! This super cute and breezy crochet top is made from classic granny squares and features an open back with adjustable ties for the perfect fit.
Whether you’re heading to a beach day, festival, or just soaking up the sun, this top brings vintage vibes with a modern twist. It’s lightweight, SO flattering, and easy to customize in your favorite colors!
Best part? The pattern is totally FREE and beginner-friendly — perfect for stash-busting and warm-weather crafting. I also have a FREE video tutorial linked as well!
This pattern is size graded from XS-4X and also includes Made-To-Measure instructions so you can ultimately use any yarn & hook that you want! It is up to you! I made mine with superfine cotton/silk/rayon blend to keep it breezy for summer, but any yarn will work! Keep scrolling for the complete written pattern and video link!
Also don’t forget to check out my Instagram or the LookBook in the PDF available on Etsy to see all of the amazing versions that my pattern testers created. They are the best!! <3

To purchase the inexpensive ad-free PDF download of this pattern, you can do so here!
A quick disclaimer—Please do not copy, redistribute, or resell this pattern in any way, including creating a video tutorial. You may sell your finished piece but please credit me as the pattern designer.
If you share your piece on social media, please credit me as the pattern designer. I would love if you tag me!! I really enjoy seeing your beautiful work.
This post contains affiliate links, I may earn a small commission if you shop from my links with no additional cost to you.

Materials
- Yarn – any yarn! I used about 115 g of super fine weight (1) Rococo Linen Yarn from Hobbii in Rocaille, Lace, Undulation, & Acanthus.
- Hook – 4 mm (I use these!)
- Tapestry needle – to weave in the ends
- Scissors – to cut your yarn
- Stitch Markers
- Measuring Tape
Gauge
Bodice: 14 st x 10.5 rows of hdc held double = 4” x 4” (10 x 10 cm)
Squares: round 1 = 1.25” x 1.25” (3 x 3 cm)
**Gauge is not crucial to this pattern if you are using made-to-measure method. Don’t stress over it!

Abbreviations
Sl st = Slip Stitch
Ch = Chain
Sc = Single Crochet
Dc = Double Crochet
Hdc = Half Double Crochet
Yo = Yarn Over
St = Stitch
Sp = Space
Sk = Skip
Important Pattern Notes
- This pattern uses US crochet terms.
- Pattern in brackets [] are worked all in the same stitch/space.
- This pattern is size graded, however you can make-to-measure also & use any yarn/hook you like.
- The starting chain of your bodice determines the anount of rounds you will make in your granny squares and granny triangles. For example: higher stitch counts will result in more rounds made in your granny squares.
- Stitch count in parentheses reflect the amount for each size (XS/S, M/L, XL/2X, 3X/4X)
Sizes
This is a graded pattern designed to be very fitted.

Estimates above are based on using weight 1 yarn and my same gauge. However, if you wanted to use another size yarn and hook you should be able to follow the measurements or take your own measurements and achieve your desired custom sweater with the made-to-measure method.
Custom Measurements
A – Measure across your bust from pit to pit.
B – Measure your bust from top down.
Let’s get started!
Written Pattern
Bodice
Notes: I held light green and dark green together to create a thicker bodice with more support. Turning ch 2 does not count as a stitch.
Row 1: Chain (51, 67, 83, 99) or until you get to your measurement A. You will want to keep your chain at one of the multiples listed above though (a multiple of 16+3.) Ch 2 more and turn. Work a hdc in the 3rd ch from hook and in each chain. (51, 67, 83, 99)
Row 2: Ch 2 and turn. Hdc in each stitch. (51, 67, 83, 99)
Repeat row 2 until you have (15, 17, 20, 22) rows or until you reach your measurement B. Fasten off yarn.
Granny Squares
Notes: Each square is worked from the middle outwards and worked in the spaces between stitches. I switched colors each round. If you are making a solid color square – instead of cutting your yarn and rejoining each row, you can keep the same working yarn and continue the pattern of your granny square by a) working a slip stitch in a few stitches until you get to a space, or b) turn your work after each round.
The amount of rounds you make is dependent on your bodice chain length. If your chain was (51, 67, 83, 99) then you’ll make your squares (3, 4, 5, 6) rounds respectively.
To Start: Grab your first color and create a magic circle OR chain 4 and join to the first chain made with a slip stitch to form a ring
Round 1: Chain 3 (counts as dc), work 2 more dc into ring *ch 2, work 3 dc into ring. Repeat from * two more times, ch 2, then join with a slip stitch into 3rd chain of the beginning chain 3. You should have 4 “clusters” and 4 ch 2 spaces as the corners. Fasten off yarn.

Round 2: Attach your yarn to a ch 2 sp. Ch 3 (counts as a dc) then work [2 dc, ch 2, 3 dc] all in that same space. *Work [3 dc, 2 ch, 3 dc] into next chain 2 space. Repeat from * two more times then join with slip stitch into 3rd chain of beginning chain 3. You should have 8 “clusters”, 4 ch 2 spaces as the corners, and 4 sides with 1 space between clusters in each side. Fasten off yarn.

Round 3: Attach your yarn to a corner ch 2 sp. Ch 3 (counts as a dc) then work 2 dc, ch 2, and 3 dc all in that same space. Make 3 dc in the next space between clusters. Then in the next corner ch 2 space you will *work [3 dc, 2 ch, 3 dc]. Then 3 dc in the next space. Repeat from * two more times then join with a slip stitch into the 3rd chain or the beginning chain 3. You should have 12 “clusters”, 4 ch 2 spaces as the corners, and 4 sides with 2 spaces between clusters in each side. Fasten off yarn. Stop here for size XS/S.

Round 4, 5, 6: Follow the pattern in Round 3, by working 3 dc in the spaces on the sides and [3 dc, ch 2, 3 dc] in the corners. You should have 16 “clusters”, 4 ch 2 spaces as the corners, and 4 sides with 3 spaces between clusters in each side. Fasten off yarn. Stop at 4 rounds for M/L, 5 rounds for XL/2XL, and 6 rounds for 3XL/4XL.

Repeat to make 6 squares.
Granny Triangles
Notes: Each triangle is worked from the middle outwards and worked in the spaces between stitches. I switched colors each round using the same color order as the squares I made. If you are making a solid color triangle – instead of cutting your yarn and rejoining each row, you can keep the same working yarn and continue the pattern of your granny triangle. Simply turn your work after each round any continue the pattern. Do the same amount of rounds as you did for your squares.
To Start: Grab your first color and create a magic circle OR chain 4 and join to the first chain made with a slip stitch to form a ring
Row 1: Ch 4 (this will count as your first dc + a ch 1). Work 3 dc into ring, ch 2, and 3 dc again into ring. Ch 1 and add 1 more dc into the ring. Fasten off yarn.

Row 2: Attach your yarn into the 3rd made chain of the first ch 4 from previous row. Ch 4 (counts as a dc and a ch 1 space). Dc 3 in the first ch 1 space. [Dc 3, ch 2, dc 3] in the next ch 2 space to make the corner. Dc 3 in the next ch 1 space, ch 1, dc 1 in the last dc. Fasten off yarn.

Row 3: Attach your yarn the same as row 2 by connecting into the 3rd made chain of the first ch 4 from the previous row. Ch 4, dc 3 in first ch 1 space. Dc 3 in next space. [Dc 3, Ch 2, dc 3] in the next Ch 2 space to make the corner. Dc 3 in the next 2 spaces. Ch 1, dc 1 in the last dc. Fasten off yarn. Stop here for size XS/S.

Row 4: Attach your yarn the same as row 3 by connecting into the 3rd made chain of the first ch 4 from the previous row. Ch 4, dc 3 in first ch 1 space. Dc 3 in next 2 spaces. [Dc 3, Ch 2, dc 3] in the next Ch 2 space to make the corner. Dc 3 in the next 3 spaces. Ch 1, dc 1 in the last dc. Fasten off yarn. Stop here for size M/L.

Row 5, 6: Follow the pattern in Round 4 by working 3 dc in the side spaces and [3 dc, ch 2, 3 dc] in the top corner spaces.
Repeat to make 4 triangles.
Seaming
Lay out your squares and triangles like below. You are welcome to seam them up however you like. I chose to do a sc along the “wrong sides” to seam mine. I used white.

Sandwich your panels with the “right sides” facing each other. Line up your stitches.
Attach your yarn in the corners or your panels and then insert your hook through the first chain stitch in each panel and make a sc. Continue until the end to seam them together working in each chain and each stitch.
Once your granny panels are all seamed, you can now attach it to the bodice.
Your bodice should line up perfectly from end to end. Sc to seam together working on the “wrong sides” like before.
You will be working into the raw sides of the stitches in the triangle panel. You will need to treat them as 2 stitches for each sideways dc. So 1 sideways dc gets 2 sc stitches. PLUS each join will get 1 sc stitch as well (there are 3 joins marked in the photo below)

Straps & Tie
Attach your yarn to the top corner or your top. Ch 200, then sl st in each chain. You can sc or hdc instead for a thicker strap. Then sl st back to your starting point to secure. Fasten off yarn & repeat for the other side. Weave your straps across your back and into the opposite side, bottom corner off the bodice. Then you can tie it up.
Optional: Add a tie to the top or your bodice to cinch it in! This gives great support & extra coverage. Attach your yarn to the top corner again and chain (34, 45, 55, 66). Fasten off yarn, then weave it in and out of the stitches in the top row until you reach the middle. Repeat for the other side.

Weave in all ends and…
You’re all done!

I would LOVE to see your creation! If you crochet this Flower Shrug please tag or DM @woolymamacrochet on Instagram so I can like & share!
If you have any questions or need help, PLEASE send me a message or leave a comment on this post.

If you enjoyed this pattern, please check out my other free patterns for wearables! Like the Seaside Shrug, Lovely Lacy Top, Granny’s Cabin Shrug, High Neck Granny Halter Top, Checkerboard Beanie or Coco Summer Crop Top! Thank you for checking out my blog and be sure to subscribe to my email list so you never miss a new free pattern!