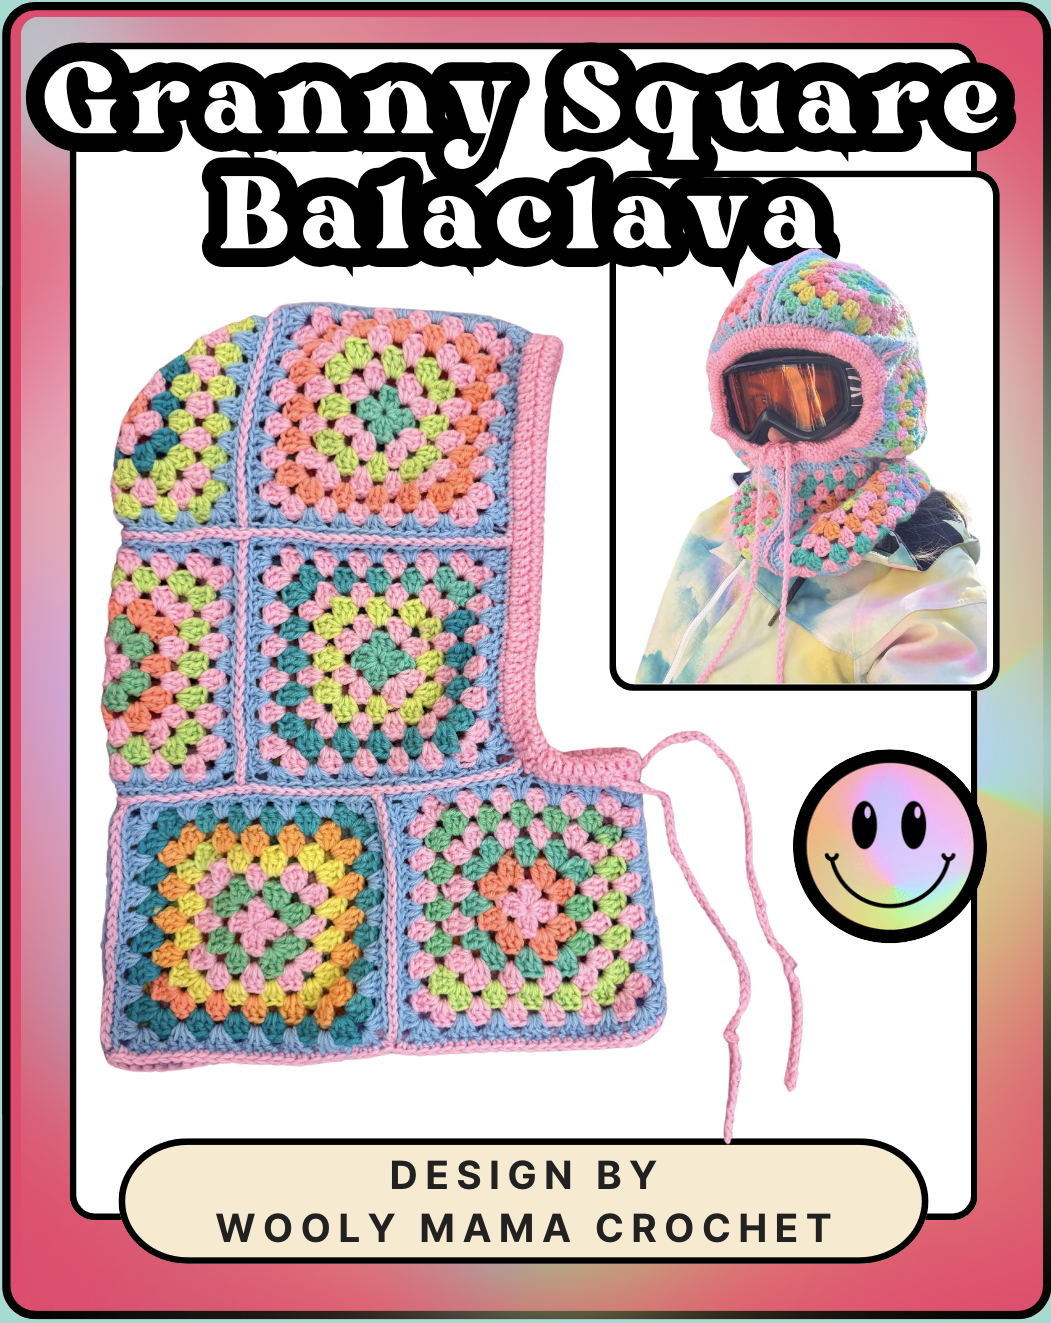
Welcome to Wooly Mama Crochet! Today I am sharing my newest FREE pattern for my new favorite piece, the Granny Square Balaclava! I designed this with my snowboarding trip in mind. I always wanted a cute hood to fit over my boring black helmet and I couldn’t find anything I liked. A common theme with the designs I make 🙂
I actually had a lot of help from my Instagram community in picking out the colors! I made my hood using a mixture of Red Heart Retro Stripe and Red Heart Petal Pink. The overall result matches my snowboard outfit perfectly! I wish I could show you a picture of me wearing it on the mountain but me and baby caught a cold right before our trip so it’s currently postponed. But I am ready to go now that I have this hood!
You might not need a balaclava big enough to fit over a helmet, and in this case you are in luck! This pattern can be adjusted to fit any size and I have had help from my wonderful pattern testers so we know exactly how to get the size you want! The adjustable drawstring will also allow you to get the perfect fit. <3

Please do not copy, redistribute, or resell this pattern in any way, including creating a video tutorial. You may sell your finished piece but please credit me as the pattern designer.
If you share your piece on social media, please credit me as the pattern designer. I would love if you tag me!! I really enjoy seeing your beautiful work and I’d love to share it on my page.
This post contains affiliate links, I may earn a small commission if you shop from my links with no additional cost to you.
To purchase the inexpensive ad-free PDF download of this pattern, you can do so here!
Measurements
This balaclava will fit snug on an adult size ski/snowboard helmet, or fairly loose on a bare head and is adjustable around the face with the drawstring. For a more fitted look reduce the amount of rounds on your squares/triangle to 5 or 6.
Gauge
3 rounds on your granny square should measure 3.5×3.5 inches. 7 rounds should measure 7×7 inches.
Materials
- Yarn – Approximately 300 grams (550 yards) of worsted weight size 4 yarn. I used 1 skein of Red Heart Retro Stripes & about half a skein of Red Heart Petal Pink
- Hook – 4 mm or similar to achieve gauge
- Tapestry needle – to weave in the ends
- Scissors – to cut your yarn
- Stitch Markers
- Blocking Board – optional but I HIGHLY recommend blocking your squares
Abbreviations
Sl st = Slip Stitch
Ch = Chain
Sc = Single Crochet
Dc = Double Crochet
St = Stitch
Sp = Space
Blo = Back Loop Only

Important Pattern Notes
- This pattern uses US crochet terms.
- [] Work the pattern in brackets all in the same stitch.
- If you wanted, you could use any yarn & hook size. In order to do so, you might need to increase or decrease the amount of rounds you do on each granny square so long as you achieve the size of 7×7 inches per square.Have fun experimenting with different colors!
Let’s get started!
Granny Squares
Notes: There will be 9 of these total. Each square is worked from the middle outwards and worked in the spaces between stitches. I switched colors each round. If you are making a solid color square – instead of cutting your yarn and rejoining each row, you can keep the same working yarn and continue the pattern of your granny square. 2 options of doing this include a) working a slip stitch in a few stitches until you get to a space, or b) turn your work after each round.

To Start: Grab your first color and create a magic circle OR chain 4 and join to the first chain made with a slip stitch to form a ring
Round 1: Chain 3 (counts as dc), work 2 more dc into ring *ch 3, work 3 dc into ring. Repeat from * two more times, ch 3, then join with a slip stitch into 3rd chain of the beginning chain 3. You should have 4 “clusters” and 4 ch 3 spaces as the corners.
Round 2: Join your next color by making a slip knot on hook, then place the hook into any chain 3 space from first round. Draw up a loop and pull through both loops. Chain 2 more (counts as a dc), then work 2 dc in same space. *Work [3 dc, 3 ch, 3 dc] into next chain 3 space. Repeat from * two more times then make 3 dc in same space as your beginning cluster, ch 3 and join with slip stitch into 3rd chain of beginning chain 3.
Round 3: Join your next color as done previously in Round 2, then make 2 more dc in same chain 3 space to make a cluster. *Make 3 dc in next space and then [3 dc, 3 ch, 3 dc] in next chain 3 corner space. Repeat from * two more times, then make 3 dc into next space, and then 3 dc in same space as your beginning cluster, ch 3 and join with a slip stitch into 3rd chain of beginning chain 3.
Round 4 – 7: Follow the pattern in Round 3, by working 3 dc in the spaces on the sides and [3dc, ch 3, 3dc] in the corners.
Repeat rounds 1-7 to make 9 squares.
**For a more fitted balaclava that won’t be over a helmet, reduce the amount of rounds to 5 or 6 – or so your squares are about 5 – 6 inches each.**
Granny Triangle
To Start: Grab your first color and create a magic circle OR chain 4 and join to the first chain made with a slip stitch to form a ring
Round 1: Chain 3 (counts as dc), work 2 more dc into ring *ch 3, work 3 dc into ring. Repeat from * one more time, ch 3, then join with a slip stitch into 3rd chain of the beginning chain 3. You should have 3 “clusters” and 3 ch 3 spaces as the corners.

Round 2: Join your next color by making a slip knot on hook, then place the hook into any chain 3 space from first round. Draw up a loop and pull through both loops. Chain 2 more (counts as a dc), then work 2 dc in same space. * Work [3 dc, 3 ch, 3 dc] into next chain 3 space. Repeat from * one more time then make 3 dc in same space as your beginning cluster, ch 3 and join with slip stitch into 3rd chain of beginning chain 3.
Round 3: Join your next color as done previously in Round 2, then make 2 more dc in same chain 3 space to make a cluster. *Make 3 dc in next space and then [3 dc, 3 ch, 3 dc] in next chain 3 corner space. Repeat from * one more time, then make 3 dc into next space, and then 3 dc in same space as your beginning cluster, ch 3 and join with a slip stitch into 3rd chain of beginning chain 3.
Round 4 – 7: Follow the pattern in Round 3, by working 3 dc in the spaces on the sides and [3dc, ch 3, 3dc] in the corners.
**Reminder – make sure to do the same amount of rounds on your triangle as you did on your squares if you reduced the amount of rounds on your squares for a more fitted balaclava. **
You should now have 9 squares and 1 triangle all with the same number of rounds. Now would be the time to block your squares if you’d like.
Joining
Lay your squares out like below. You are welcome to join your squares any way that you prefer. I opted for a slip stitch back loop only that I’ll walk you through how to do.

Join along the black lines. I recommend joining them in my number order listed. The 2 squares at the top will join with each other on join 6 & the two squares at each end on the bottom will join with each other on join 4.
For join 8 you will start your join in the middle of your square from the bottom row. The end of the join will also end up in the middle of the last square.
How to Join with Sl St Blo
Start by attaching your yarn to any square corner, working on the “right side”. Line up another square that you’ll be seaming to. Keep your working yarn underneath your squares while working on the “right sides” of both squares.
Insert your hook into the back loop only of the first stitch on your first square and then through the back loop only of the same stitch on the other square. Then slip stitch by yarning over and pulling through all loops. Repeat this process down the square(s).

Trim
Your balaclava should look something like this now. We will add the trim around the face with the drawstring, and then finish the bottom with a round of sc.

Face Trim
Attach your yarn to any stitch around the face opening. I chose a corner so it can be hidden easily.
Notes: The chain at the end of each round does not count as a stitch.
Round 1: Working on the “right side” sc in each stitch. Then sl st to your first sc and chain 2.
Round 2: Dc in each stitch. Then sl st to your first dc and chain 2.
Round 3: Dc in each stitch. Then sl st to your first dc and chain 1.
Round 4: Sc in each stitch. Then sl st to your first sc and fasten off leaving a tail that is a few inches longer then the length of the entire face opening, so we can use that to sew it closed.

Fold your trim inwards. Use the long tail and your darning needle to sew the trim closed, forming a tube for your tie.
Seam with a whip stitch by inserting your needle through the top of the sc stitch from round 4 and then through the “legs” of the sc stitch from round 1, as shown above. Pull through and repeat the process all the way around. Fasten off yarn.
Drawstring & Finishing
Drawstring
Chain 150. Leave the tail out for now so you can use it with your needle to weave it inside of your face trim.
Put the tail of the chain onto your needle, count 4 dc stitches from the bottom center of your trim, and insert your needle. I recommend doing a few inches at a time, by having your needle come out of the trim, pulling through, and then reinserting your needle through the same hole. Pull the drawstring all around through your face trim and have it come back out 4 stitches from the bottom center again (8 stitches from where it entered.) This might be a little tricky but you will get the hang of it. 🙂
I finished off by tying a little knot on each end of the ties. You could also add some beads here if you wish.

Finishing
Attach your yarn to the neck opening at the bottom and sc around in each stitch. I used the same color that I did to join my squares.
Weave in all ends and then …
You’re all done!

I would LOVE to see your creation! If you crochet this Granny Square Balaclava please tag or DM @woolymamacrochet on Instagram so I can like & share!
If you have any questions or need help, PLEASE send me a message or leave a comment on this post.
If you enjoyed this pattern, please check out my other free patterns! Like the Granny’s Cabin Shrug, Retro Heart Daisy Tapestry or my Solid Stripe Bucket Hat! Thank you for checking out my blog and be sure to subscribe to my email list so you never miss a new free pattern! Plus you can get a free PDF pattern when you join! 🙂 & don’t forget to subscribe to my Youtube channel!