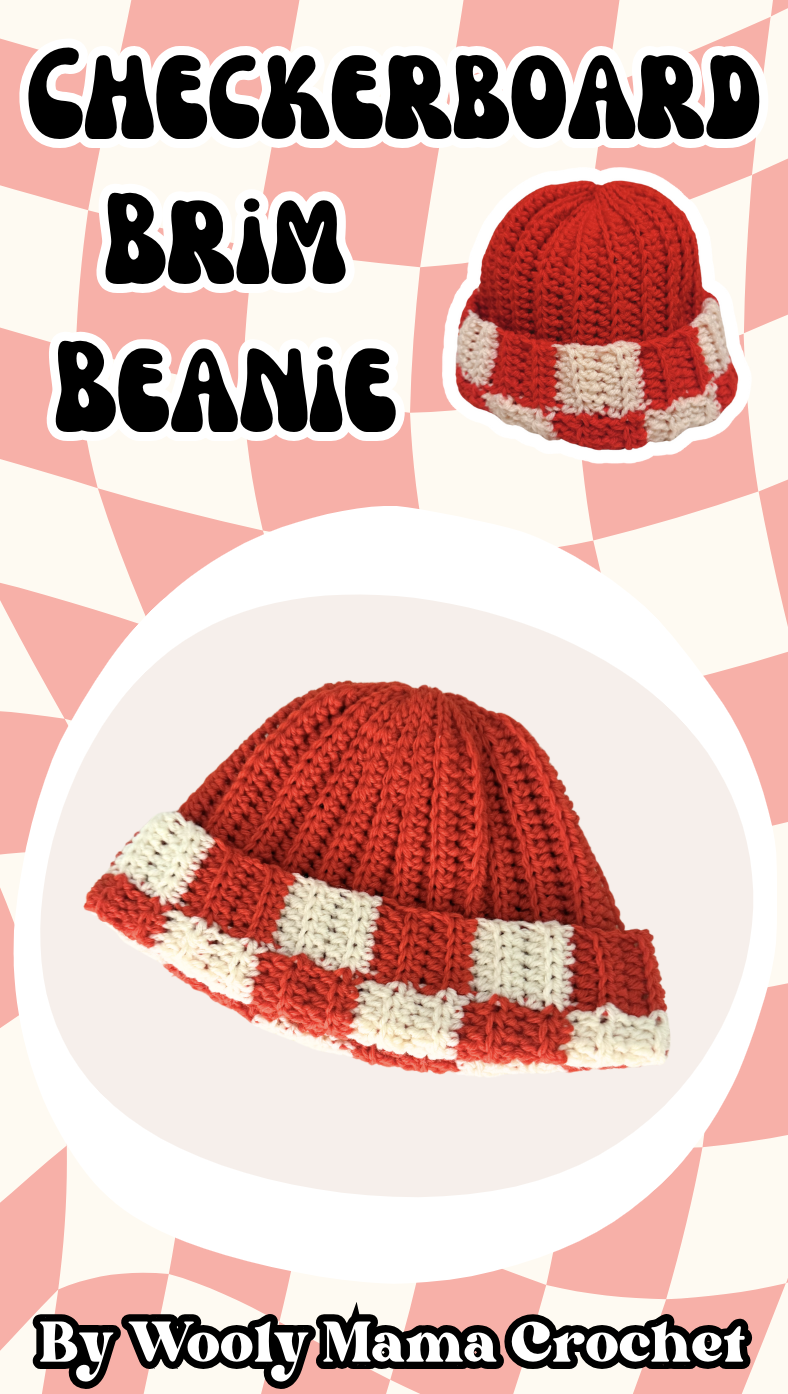
This checkerboard brim beanie is so unique! The checkerboard brim gives a fun and playful aesthetic, while not being too overwhelming with the pattern. I love this beanie for gift-giving to any man or woman or teenager too!
Checkerboard is very trendy right now & so this hat will fit right in! I wanted to make something a little different than the checkerboard beanies I have seen online, and so this checkerboard brim beanie design was born! I want to thank my incredible pattern testers for helping me get this pattern ready. <3

You may sell the finished product as long as I am credited for the pattern. Do not copy and publish this pattern as your own.
This post contains affiliate links, I may earn a small commission if you shop from my links with no additional cost to you.
To purchase the inexpensive ad-free PDF download of this pattern, you can do so here!
Measurements
This pattern is one size and will fit most adults. 😁 The finished size of this beanie using my gauge is 22 inch head circumference (28 inches stretched) and 9.5 inches from top to bottom. Note that the bottom couple inches will then flip up for the brim. Using a larger hook might help you meet the gauge if you are a tight crocheter. When I use a hook size of 5.5 or 6 mm instead this added an extra 2 inches to the circumference and .5 inches to the height.
For a longer/taller beanie you can add an additional 10 chains to your starting chain, split evenly between the colors. Your stitch count will be 50 instead of 40. This is about 15 g extra of yarn.
For example, you will chain 8 of color A, then 42 + 1 of color B. You will have checker blocks 8 stitches long instead of 6.
Alternatively, you can just add 10 additional chains to color B and the checker blocks will remain the same size of 6 stitches.
Gauge
17 sts and 8 rows of hdc blo measure 4 x 4 inch using a 5 mm crochet hook.
Materials
- YARN | about 90 grams of any weight 4 yarn per beanie. I like worsted acrylic or wool for mine. I recommend “I Love This Yarn” by Hobby Lobby for a good soft and stretchy value acrylic yarn with a big selection of colors!
- Color A – about 15 grams weight 4 yarn
- Color B – about 75 grams weight 4 yarn
- 5 mm hook (size H) (or 5.5 mm or 6 mm for a larger sized beanie)
- tapestry needle to weave in the ends
- scissors to cut your yarn
- Pom-Pom (optional) I linked the ones I use for my beanies & loved!

Abbreviations
Sl st = Slip Stitch
Ch = Chain
Hdc = half double crochet
Blo = back loop only
St = stitch

Pattern Notes
- This pattern uses US crochet terms.
- The turning chain does not count as a stitch.
- This pattern is worked side to side to form a rectangle shape. You’ll then sew up the side seamlessly and cinch the top.
- You can leave your yarns connected while working through a section. Keep your carried yarns on the same one side, so they will be easily hidden inside your beanie.
- If you are a tight crocheter, I recommend to go up a hook size to 5.5 mm or 6 mm.
- You will work a regular hdc immediately after each color change instead of a hdc blo. This makes the color change look seamless. The only time you will do a hdc blo immediately after a color change is when you are starting a new color “section.”
- Have fun experimenting with different colors!
How to Change Color
For the checkerboard brim design, you will change color in your starting chain. To do this, chain the full complete amount of chains listed in the pattern before switching colors.
For this example below, the pattern would read “In color A, chain 6. Then switch to color B and chain 6 more”. Don’t stress if this is difficult, if you are off count by 1 chain in yours it won’t make a huge difference. 🙂

During the regular rows, while you are finishing your last stitch of the first color, pick up the next color and pull through the last loops of your stitch. For example, for a hdc you will yarn over, insert hook, yarn over, pull through the stitch, yarn over with the new color and pull through all loops. Keep carried colors all on the same side. This is the “wrong side.” I also recommend working over the carried yarns.

Let’s get started!
Pattern
Row 1: With color A, chain 6. Join color B and chain 34 + 1. Turn. Don’t chain too tightly.
Row 2: Work each stitch in this row in the back bumps of the chain. Starting with the second chain from hook, sl st 5, hdc 29. Switch to color A and hdc 6. Keep carried yarns on the side closest to you at this point, this will be your “wrong” side. Ch 1 and turn. (40)
Row 3: Hdc blo 6. Pick up color B, hdc in the next stitch, hdc blo in the next 28. Sl st blo 5. Ch 1 and turn. (40)
Row 4: Sl st 5 blo, Hdc blo 29. Switch to color A. Hdc 1, then hdc blo 5. Ch 1 and turn. (40)
Row 5: Hdc blo 6. Pick up color B, hdc in the next stitch, hdc blo in the next 28. Sl st blo 5. Ch 1 and turn. (40)
Row 6: Sl st 5 blo, Hdc blo 23. Switch to color A and hdc blo 6. Note that we didn’t do a regular hdc for this color change because we are starting a new color “section”. This helps with the seamless color changes. Switch back to color B and hdc blo 6. Ch 1 and turn. (40)
Row 7: Hdc blo 6. Pick up color A, hdc in the next stitch, hdc blo in the next 5. Pick up color B and hdc in the next stitch, then hdc blo in the next 22. Sl st blo 5. Ch 1 and turn. (40)
Row 8: Sl st 5 blo, Hdc blo 23. Switch to color A and hdc 1 then hdc blo 5. Switch back to color B and hdc 1 then hdc blo 5. Ch 1 and turn. (40)

Row 9: Hdc blo 6. Pick up color A, hdc in the next stitch, hdc blo in the next 5. Pick up color B and hdc in the next stitch, then hdc blo in the next 22. Sl st blo 5. Ch 1 and turn. (40)
At this point you should have 2 checker sections, 4 rows wide of each. We will continue this pattern until you have 12 checker blocks across the bottom total. (4 rows x 12 blocks = 48 rows total) (the starting chain will not count as a row)
Row 10: Sl st 5 blo, Hdc blo 29. Switch to color A and hdc blo 6. Ch 1 and turn. (40)
Row 11: Hdc blo 6. Pick up color B, hdc in the next stitch, hdc blo in the next 28. Sl st blo 5. Ch 1 and turn. (40)
Row 12: Sl st 5 blo, Hdc blo 29. Switch to color A. Hdc 1, then hdc blo 5. Ch 1 and turn. (40)
Row 13: Hdc blo 6. Pick up color B, hdc in the next stitch, hdc blo in the next 28. Sl st blo 5. Ch 1 and turn. (40)
Row 14: Sl st 5 blo, Hdc blo 23. Switch to color A and hdc blo 6. Switch back to color B and hdc blo 6. Ch 1 and turn. (40)
Row 15: Hdc blo 6. Pick up color A, hdc in the next stitch, hdc blo in the next 5. Pick up color B and hdc in the next stitch, then hdc blo in the next 22. Sl st blo 5. Ch 1 and turn. (40)
Row 16: Sl st 5 blo, Hdc blo 23. Switch to color A and hdc 1 then hdc blo 5. Switch back to color B and hdc 1 then hdc blo 5. Ch 1 and turn. (40)
Row 17: Hdc blo 6. Pick up color A, hdc in the next stitch, hdc blo in the next 5. Pick up color B and hdc in the next stitch, then hdc blo in the next 22. Sl st blo 5. Ch 1 and turn. (40)
At this point you should have 4 checker sections now.
Rows 18-49: Repeat making Row 10-17 for four more times. You should have 12 checker blocks of 4 rows wide (not including the chain) and end after the 5 sl st blo. (40)
Fasten off yarns with long tails.

Seaming the Sides
I will share with you my favorite way to seamlessly join the beanie so that you can’t even see it! My crochet pet peeve is being able to see the seams on beanies, so I Iove this method the most!
Start with your tail at the top of the beanie, at the end of the 5 Sl st blo. Fold the beanie over so the wrong sides are facing out and the beginning and end sides are on top of each other.
Take your darning needle with the tail, and go through the front loop only of the top edge, and then go through both loops on the other edge. Pull through. Repeat this process inserting your needle through the top panel and continue going down until you reach your next color & tail. With the next color on your needle, continue to seam by going through the front loop on the top panel, and both loops on the bottom panel. Repeat for last color section with a new yarn if needed.
Tie off ends and weave in.
Note: Remember that the brim will be flipped up, so take that into account while you’re weaving in your ends so you can hide them well.

Cinching the Top
With the beanie still inside out, take a 10 inch yarn the same color as the top of your beanie and use your darning needle to weave the tail in and out along the top stitches of your beanie. Go around the whole top and pull very tightly to close. If you need to cut a new piece of yarn to use to cinch the top, that’s fine, just make sure to tie it tight & weave in the ends!

Weave in all ends, flip your beanie right side out, add a pom-pom to the top if you want, and you’re done! I like to use the furry pom-poms or make my own using the Clover brand pom-pom maker 🙂
All done!

I would LOVE to see your creation! If you crochet this Checkerboard Brim Beanie please tag or DM @woolymamacrochet on Instagram so I can like & share!
If you have any questions or need help, PLEASE send me a message or leave a comment on this post.
If you enjoyed this pattern, please check out my other free beanie patterns! Like the Plain Ribbed Beanie, Patchwork Beanie, Checkerboard Beanie or Patchwork with Accent Brim Beanie! You can never have enough 🙂
